Quality Pool & Spa Replacement Parts Since 1950
1.800.854.2466
Winterizing Your Pool is a Snap!

Year-Round Features:
- Drain your skimmer, not your pool™ to prevent costly freeze damage to skimmer.
- Recessed lid design prevents shifting ice from removing the lid.
- Saves metal pool walls from corrosion year round.
- Guaranteed not to leak! UV and chemical-resistant, good to minus 80° F below zero.
Models Available:
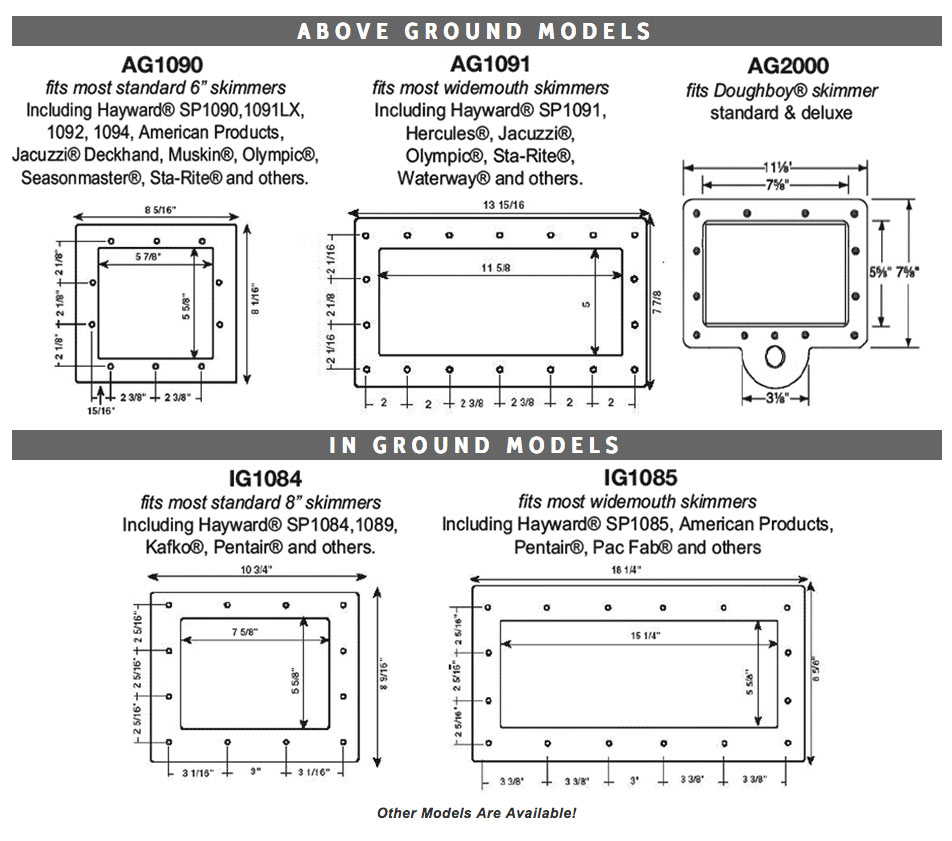
AG1090 Fits standard above ground skimmers, including: Hayward® 1090, 1092, 1094, PoolStyle™, Hydrotools™, American Products™, Jacuzzi®, Muskin™, Olympic®, Waterway™, and others
AG1091 Fits widemouth above ground skimmers, including: Hayward® 1091, PoolStyle™, Hydrotools®, Pentair™, Waterway™, and others
AG2000 Fits Doughboy above ground skimmers, including: Vac Port Cover
IG1084 Fits standard in ground skimmers, including: Hayward®, Kafko™, Pentair™, Waterway™, and others
IG1085 Fits widemouth in ground skimmers, including: Hayward® 1085, Kafko™, Pentair™, Waterway™, and others
Model Size Template and Instructions
The SKIMSAVER™ LID'L SEAL™ fits the most popular standard and widemouth above ground and in ground skimmers. To determine which model will fit the existing skimmer, measure the bolt pattern of the faceplate and compare to the templates below. The bolt pattern of the Lid' L Seal™ should match the bolt pattern of the existing skimmer exactly; the interior or exterior dimensions may differ slightly.
INSTALLATION
NOTE: Skimmer gaskets DO NOT come with the SkimSaver™ LID'L SEAL™. On new pool installations simply install the new gaskets that came with your skimmer. ON existing pools it is highly recommended that you replace your skimmer gaskets when installing LID'L SEAL™.
*If gaskets are torn or show any wear they MUST be replaced.
ITEMS REQUIRED:
#3 Phillips head screwdriver
O-Ring lubricant
New skimmer gaskets (see recommendations above)
PREPARATION:
New Pools: LID'L SEAL™ should be installed prior to completely filling your pool with water.
Existing Pools: Drain pool water just below the skimmer's opening, 1"-2". Assemble required items.
INSTALLATION INSTRUCTIONS:
- 1. Remove existing skimmer faceplate using a #3 Phillips head screwdriver. Keep the screws; you will be using them to reinstall your SkimSaver™ mounting plate.
- 2. Inspect gaskets and replace if necessary. See above recommendations.
- 3. Align gaskets and new SkimSaver™ mounting plate against skimmer opening and reinstall existing screws. Hand-tighten using a #3 Phillips head screwdriver.
DO NOT OVER TIGHTEN. - 4. Apply a thin bead of Magic Lube® along the inside lip of the flexible lid to ensure a water tight seal.
- 5. Now when you are ready to seal off your skimmer - simply snap on the LID'L SEAL™ pressing firmly around the entire perimeter for a positive seal.
No need to drain your water again! In the future, LID'L SEAL™ will simply snap on and peel off. The SkimSaver™ mounting plate will remain permanently installed on your skimmer. Use the LID'L GUARD™ during the swim season.